16 October, 2013

Kitchen...!!!!

Here's a quick look back at the original 1951 kitchen we started with.
We gutted that kitchen and lived with the much improved version.
This is what it looked like the morning demolition started...
it really was a cute kitchen.
 
 
Fast forward about 4 months and we're finally here...
Granite installation day!
I felt like it should be a National Holiday or something...
this was better than Christmas morning when I was a kid :)
 
 
It was somewhat of a wresting match to get it in place.
There's only one seam in this stretch of countertop...
it's in the middle of the sink and is barely noticeable.
You couldn't find it if I didn't point that out.


As soon as they were installed, I started my next project...
the backsplash.
The sink and dishwasher weren't even hooked up yet.
Vintage coolers make great sinks.
 
 
These tiles were definitely easier to work with than the 18" and 20" floor tiles!
 
 
Mixed my own custom light grey grout :)
 
 
One of my favorite details in the kitchen.
Yes, those are tiny finishing nails I used as spacers.


I absolutely love how it's all turned out!
It's even better than I envisioned it would or could be.
 
 
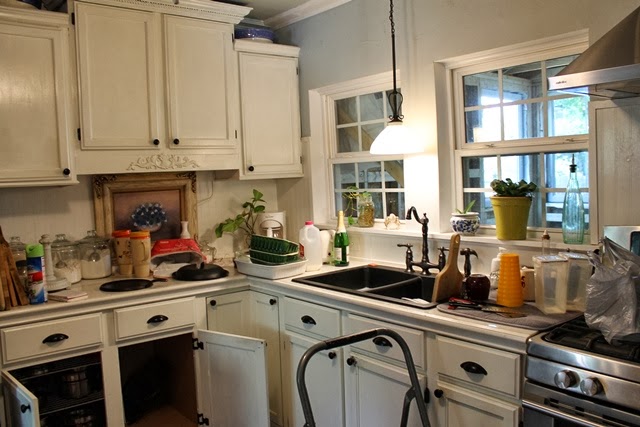
Here are a few more pictures of our finished kitchen...well, 99.9% finished .


With the exception of actually expanding the size of the kitchen...
this was all done inexpensively.
Stock unfinished cabinets from Home Depot.
We were able to order 36" uppers.
I painted them myself.
We added 1'x4's and crown to the top.
The crown runs all around the kitchen for a custom look.
This isn't the route for lots of people, but we used them in our last kitchen and actually liked them.
I can repaint whenever I feel like it.
They're not $15,000 of laminate cabinets.
They came in at about $1,000.
That works for me.
They don't have self closing drawers or doors...
what's the purpose for that anyway?
The backsplash tile is from Lowes.
The porcelain floor tile is from a local store and was only $1.69 per square foot.
Our Bosch dishwasher...love...was a return at our local Best Buy...less than half the price of a new in the box one.
Cabinet hardware was purchased online...solid brass.
We reused the sink, faucet, stove and range hood from our previous kitchen.
Lanterns were a yard sale find...I removed the glass, took them apart and painted them...
$10 for the pair.
Schoolhouse lights were a Craigslist find.
Notice that the canopies at the ceiling are different.
Our electrician thought I was crazy for using the lighting I chose throughout the addition.
He soon figured out that he was correct.
We saved thousands of $$$ because I did almost all the finish work myself.
I did all the painting...
floor tiling...
backsplash tiling...
grouting...more painting...
I've been busy, but I've loved every minute of it.
 
ann marie


21 September, 2013

Master Bath Tiling, Tiling and More Tiling...

  Master Bath...I love you
I love this 20" floor tile.
It looks like gray marble.
Plan A was to set it diagonally...
then I had my head examined and decided on...
Plan B...set them as squares...
we decided on the KISS method.


Who needs to go to the gym when you have the pleasure of setting these babies!


We hired a tile guy to handle the shower area.
It's been waterproofed...


a concrete floor...two layers...more waterproofing
 
 
our seating area...
 
 
I chose to tile the rest of our bath myself...
it's not perfect, but I think it looks really good...


I know...lots of pictures...lots of tile...


I'm using white grout in here...
it's very forgiving :)
 
 
Kitchen tile details next...
and countertops...
I can see the light at the end of the tunnel.
Now we just have to take care of the moat we have in the backyard...


It's all looking good though :)
 
ann marie


08 September, 2013

We Are So Close to a Finished Kitchen...

 
Here's a photo synopsis of the last week and a half...
 
 
wall/ceiling texture...
orange peel to match the original part of the house...
 
 
painting cabinets...
 
 
and drawer fronts...
 
 
doors were hung...
 
 
so were cabinets...
 
 
crown molding through the whole kitchen...
 
 
 except for where my range hood will go.
 
 
floor leveling where the old kitchen met the new addition...
 
 
measuring for granite counter tops...
 
 
my schoolhouse lights...finally :)
 
 
island lighting...
and today's project...
 
 
tiling!


There's still a lot for us to do, however,  I can see the light at the end of the tunnel ...
and I'm actually enjoying this whole experience :)
 
ann marie


27 August, 2013

People...We Have WALLS!

Things are rolling along here...
we have walls.
As I write this post, I have workers floating...
sheetrock.
They're singing as they work.
I like it.
 
 
It all started with insulation...lots of it.
We're on Pier and Beam, so the underneath of the house will be insulated.
 
 
Sheetrock delivery.
110 sheets.
 
 
Matry liked our new "couch".
I don't know where she comes up with this stuff.
 
 
We get such great light in this house.
You can see where the old kitchen ended.
That dark rectangle at the bottom left was where the original sink cabinet was.
There's a strip of OSB to transition the old with the new.
 
 
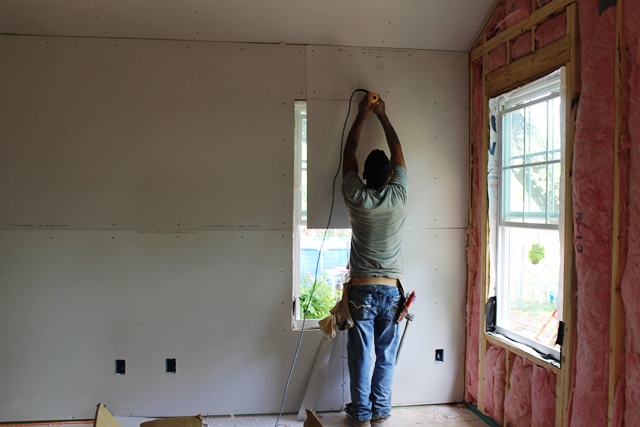
It was very interesting watching these guys work.
There are two windows on this wall.
They have a zip type of tool, something like a
Dremel I guess and that's what they use to cut the openings.


Next was the taping and mudding...
 
 
Things are starting to look "finished".
 
 
They'll sand next...
that will be a huge mess!
After that's done though, I'll be able to clean my house!!
At this stage in the process, cleaning feels like a losing battle.
Most of the walls will be textured.
I'll install cabinets as soon as the walls dry and get the granite folks out to template my countertops.
We're using a family owned company located here in Schertz and they've really been great to work with!
 
 
The fun stuff starts soon!
 
ann marie